
You don’t have to be “hardcore off-grid” to want reliable water.
Maybe you’re tired of wondering what you’d do during a long outage. Maybe you’re eyeing a cabin, a rural property, or even just a backup plan for your home. Or maybe you’ve realized that city water is convenient… until it isn’t.
The good news: Off-Grid Water Made Simple: How to Stay Supplied Without City Water (Even If You’re a Beginner) is absolutely doable—if you stop trying to solve everything at once and focus on the basics in the right order.
Simple beats complicated.
In this guide, you’ll learn:
- The few variables that matter most for dependable off-grid water setup
- A beginner-friendly, step-by-step plan for water collection, storage, and treatment
- The most common mistakes that quietly ruin otherwise “good” water plans
Next: a quick reality check that will make you feel a lot more normal if this has felt confusing.
Quick Reality Check

Off-grid water planning feels harder than it needs to because it sits at the intersection of safety, logistics, and daily habit. Most people don’t think about water until they have to—then they try to fix it fast.
Common situations that push people into figuring this out:
- You’re preparing for outages and realize water is the first thing that becomes a daily problem
- You’re moving rural and discover “water access” isn’t a given
- You’ve got storage, food, and power handled—but your water plan is vague
You’re not behind—you just need a simple plan.
Next: the core framework that keeps you from buying random gear and still feeling unprepared.
The Core Framework
When you want Off-Grid Water Made Simple: How to Stay Supplied Without City Water (Even If You’re a Beginner), it helps to think in three layers. This keeps you calm and prevents “solution hopping.”
1) What matters most (the variables)
There are a few key variables that drive every smart off-grid water decision:
- Source: where your water comes from (rain catchment, well water, surface water, delivered water, etc.)
- Quality: what might be in it (sediment, microbes, chemicals—varies by source)
- Volume: how much you realistically need for drinking, cooking, hygiene, pets, and cleanup
- Storage: how you’ll hold enough water without contamination or constant refilling
- Treatment: how you’ll make it safer and more usable for your intended purpose
- Reliability: how it works when conditions change (winter, drought, outages, equipment failure)
2) The basics (core actions)
The basics are boring—but they’re what keep you supplied:
- Choose a primary source and a backup source
- Store more than you think you’ll need
- Treat water appropriately for the source
- Build simple routines you can repeat under stress
3) The “next layer” (the upgrade people skip)
This is what many people skip: a system.
A system means you can answer:
- “What do we do today?”
- “What if our main source fails?”
- “What if the water is cloudy?”
- “How do we scale this up for longer periods?”
Example: You might start with stored water (basic), then add rainwater collection (next layer), then add a consistent filtration/purification routine (system).
Simple beats complicated means you build reliability in stages instead of trying to engineer the perfect setup on day one.
Next: the step-by-step plan you can follow this weekend—without overwhelm.
The Step-by-Step Plan
This is a Beginner’s Guide approach. You’ll start with safety and reliability, then expand into convenience.
Step 1: Define your “minimum daily water” target
Most off-grid water planning breaks down because people don’t choose a realistic target. You don’t need a perfect number—you need a usable one.
Start by separating:
- Essential water (drinking + basic cooking)
- Functional water (washing hands, dishes, quick cleanup)
- Comfort water (showers, laundry—nice, but not always first)
Checklist
- Decide who the plan covers (adults, kids, guests)
- Include pets and basic sanitation
- Choose a minimum target and a better target
- Decide how many days you want to cover without refilling
- Identify what you can temporarily reduce during an outage
Do this now: Write your minimum daily target on paper and pick a number of days you want to cover.
Step 2: Choose a primary source and a backup source
A calm off-grid water solution is rarely “one thing.” It’s usually one main source + one backup.
Primary sources may include rainwater harvesting, a private well, a nearby natural source, or delivered water you store. Backup might be stored water, a secondary collection method, or another accessible supply.
Checklist
- List every realistic water source near you (even if imperfect)
- Mark each as “everyday,” “emergency,” or “seasonal”
- Identify what changes in winter (freezing) or dry months
- Choose one primary source you can maintain
- Choose one backup source you can use quickly
Do this now: Pick your primary and backup water source—even if you later improve them.
Step 3: Build storage first (before you “optimize” anything)
Storage is the quiet hero. If you can store enough water, you reduce urgency—and urgency is where mistakes happen.
Good storage is about:
- Food-safe containers
- Consistent rotation or refresh routines
- Keeping contaminants out
- Having water where you’ll actually use it
Checklist
- Choose containers meant for water storage (food-safe)
- Store water in more than one container (not a single point of failure)
- Keep it cool, shaded, and sealed
- Label dates and create a simple rotation habit
- Include a way to move water (spigots, smaller jugs, carry handles)
Do this now: Set up at least one “ready-to-use” water container you can access today.
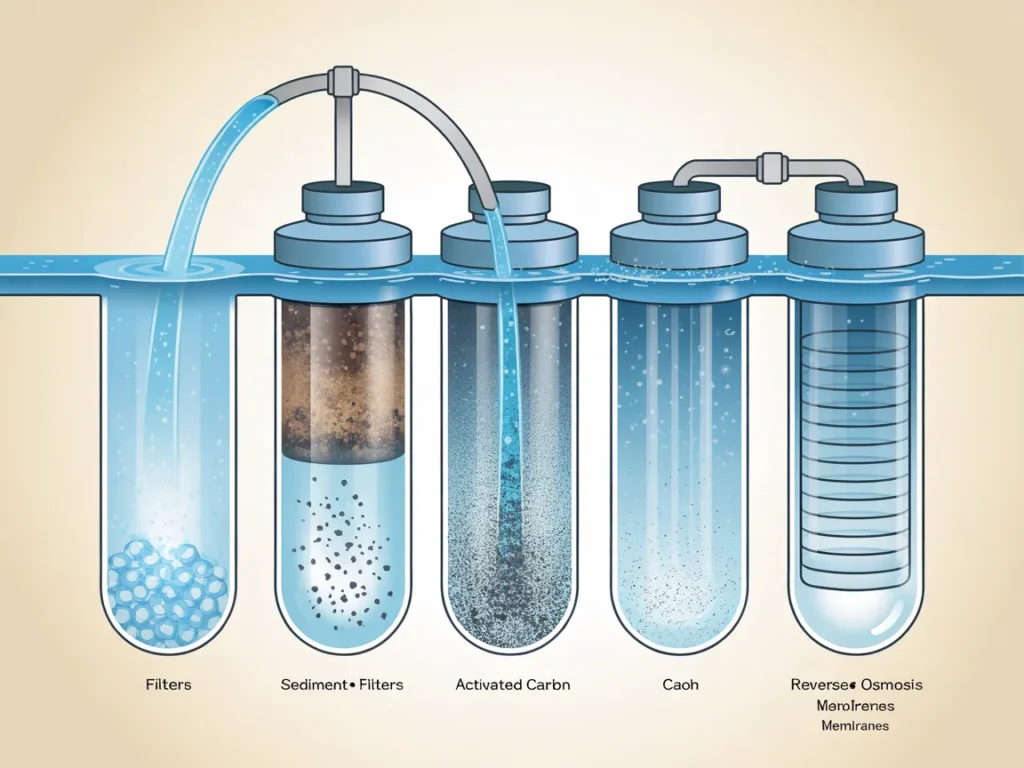
Step 4: Match treatment to the water source (not your hopes)
This is where beginners get stuck—because “water treatment” is a big umbrella.
Different sources require different approaches:
- Clear stored water may need less intervention if properly handled
- Rainwater can pick up debris and contaminants depending on collection surfaces
- Surface water (streams/ponds) may require more robust treatment due to microbes and sediment
- Well water can vary widely by location
The goal isn’t to obsess. The goal is to treat water in a way that matches the risk level and use-case.
Checklist
- Decide what water is for: drinking, cooking, hygiene, washing
- Plan for pre-filtering if water is cloudy or has sediment
- Choose a consistent method you can repeat correctly
- Store treated water in clean containers
- Keep written steps so you’re not relying on memory
Do this now: Create a simple “treating routine” you can follow the same way every time.
Step 5: Make it usable day-to-day (so you’ll actually maintain it)
A water plan that’s annoying will slowly fail. You want a setup that fits your routine, your energy level, and your household.
This is where little things matter:
- Where you place containers
- Whether refilling is easy
- Whether treatment steps are straightforward
- Whether everyone in the house understands the basics
Checklist
- Set up a dedicated water zone (storage + tools)
- Keep a written quick-reference sheet with your steps
- Prep for spills and cleanup (basic sanitation supplies)
- Teach the plan to one other person (so it’s not all on you)
- Do a simple “one day test” using your setup
Do this now: Run a 24-hour test where you use your backup water plan like it’s real.
Step 6 (optional): Add redundancy so one failure doesn’t ruin the whole plan
Redundancy is the difference between “we have water” and “we stay supplied.”

Add backup for:
- Treatment (more than one method)
- Storage (multiple containers)
- Access (ways to move and dispense water)
- Source (at least two options)
Checklist
- Keep a spare container and spare dispensing method
- Keep a backup treatment option appropriate to your source
- Store a printed checklist in the same place as your supplies
- Identify the “weakest link” in your current setup
- Improve that one link first
Do this now: Choose one point of failure and add a backup this week.
Next: the mistakes that quietly sabotage off-grid water plans—even smart ones.
Common Mistakes
Mistake 1: Starting with gear instead of a plan
Why it happens: Buying feels productive, and water gear is marketed as “one and done.”
Simple fix: Pick your source, daily target, and storage plan first—then buy to support that.
Mistake 2: Underestimating storage needs
Why it happens: People picture drinking water only, not cooking and cleanup.
Simple fix: Separate “minimum” and “better” targets and build from minimum upward.
Mistake 3: Assuming one treatment method covers every scenario
Why it happens: Water quality changes by source and season.
Simple fix: Match treatment to the source and keep a backup method for “worse than usual” water.
Mistake 4: Not having a clear routine for rotation and cleanliness
Why it happens: Storage is easy to set up and easy to ignore.
Simple fix: Label containers, set a simple refresh schedule, and keep tools clean and together.
Mistake 5: Making the system too complicated to maintain
Why it happens: It’s tempting to build a “perfect” setup you don’t actually use.
Simple fix: Keep steps few and repeatable. Simple beats complicated in real life.
Mistake 6: Not testing the plan under normal conditions
Why it happens: People wait for an emergency to find out what works.
Simple fix: Do a 24-hour test day and adjust based on friction points you notice.
Options Comparison
Here are five common approaches to off-grid water. None is perfect for everyone—what matters is fit for your household, location, and time.
Option 1: Stored water only (containers, barrels, jugs)
Best for: Apartments, beginners, short outages, simple backup plans
Pros
- Fast to set up
- Works anywhere
- Easy to control water quality if handled correctly
Cons
- Limited duration unless you store a lot
- Requires rotation/refresh routines
- Moving water can be inconvenient
Option 2: Rainwater collection (catchment + storage)
Best for: Homeowners with roof access, areas with decent rainfall
Pros
- Renewable source
- Scales with storage capacity
- Can support non-drinking uses well (depending on handling)
Cons
- Seasonal variability
- Collection surface and debris management matter
- Requires planning for first-flush and sediment
Option 3: Private well water (existing well system)
Best for: Rural homeowners with a current well
Pros
- Convenient when working
- Can supply large volumes
- Feels “normal” for daily life
Cons
- Power dependence unless you plan around it
- Water quality varies by location
- Mechanical failures can stop supply
Option 4: Surface water use (river, stream, pond) + treatment
Best for: Properties with reliable nearby natural water
Pros
- Potentially large supply
- Useful as an emergency source
- Can work even when stored water runs low
Cons
- Requires strong treatment and consistency
- Sediment and microbes are common concerns
- Access can be harder in winter or storms
Option 5: Delivered water + larger storage
Best for: Remote locations where delivery is feasible
Pros
- Predictable resupply (when available)
- Less equipment complexity at the source
- Works well with solid storage planning
Cons
- Delivery disruptions are possible
- Requires substantial storage space
- Still needs cleanliness and rotation routines
Which option should you pick?
For self-sufficiency seekers (and most homeowners building resilience), the best path is usually: start with stored water for immediate reliability, then add a renewable source (rainwater or well) if your location supports it, and finally build a simple treatment routine you can repeat without second-guessing. Choose based on your constraints: how much time you have, what your property allows, and how hands-on you want to be.
Next: a resource that walks through an off-grid water approach in a structured way.
Resources
If you’ve been looking for Off-Grid Water Made Simple: How to Stay Supplied Without City Water (Even If You’re a Beginner), the hardest part is rarely motivation—it’s clarity.
You can piece together advice from videos and forums, but it’s easy to end up with a pile of options and no confident system.
WaterSmartBox is presented as a step-by-step walkthrough designed to help you think through off-grid water in a more organized way, so you can see what to do first, what to do next, and how the pieces fit together.
Even if you don’t buy anything afterward, the presentation can still be useful for understanding the overall approach and deciding what makes sense for your situation.
SEE THE FULL PRESENTATION HERE
In the presentation, you’ll see a clearer walkthrough you can compare against your plan—so you can keep what works and fix what doesn’t without overcomplicating it.
In the presentation, you’ll see:
- How the WaterSmartBox approach is laid out as a system (so you’re not guessing the order)
- What’s included in the WaterSmartBox resource/training as shown on the page
- How it’s meant to help beginners think through off-grid water more simply
FAQ
Beginner-friendly expectations
Is this beginner-friendly if I’ve never done off-grid water before?
Yes—this is exactly where a simple, step-by-step approach helps, and the presentation is framed as a walkthrough rather than an advanced engineering project.
Do I need special tools or technical skills?
You don’t need to be an expert to start with the basics—source, storage, and a repeatable routine. The presentation is meant to clarify the system so it’s easier to follow.
How long does it take to get a basic setup in place?
A basic stored-water setup can be done quickly. Bigger systems (collection/treatment routines) take longer, but the point is to build in stages.
Practical fit
What if I live in a normal house, not a cabin?
A “home backup” plan is often the easiest place to start. You can build storage and a routine without changing your whole lifestyle.
What if I don’t have access to a well, stream, or land?
Stored water and practical backup sourcing are still possible in many living situations; the key is choosing options that match your constraints.
Does this help with long-term self-sufficiency planning?
It can, especially if you use the framework to expand from basic storage into a more resilient system over time.
Keeping it simple
I get overwhelmed by conflicting advice—will this help me decide what to do first?
That’s the main value of a structured walkthrough: it helps you sort the order of operations so you’re not trying to solve everything at once.
Can I watch the presentation first and decide later?
Yes—you can use it to understand how it works, what’s included, and whether it fits your needs before making any decisions.
Next: a clean recap you can use as your simple action plan.
Mini Summary + Action Plan
Use this as your quick-reference reset for Off-Grid Water Made Simple: How to Stay Supplied Without City Water (Even If You’re a Beginner):
- Pick a realistic minimum daily water target for your household
- Choose a primary water source and a backup source
- Build storage first so you’re not forced into rushed decisions
- Keep containers clean, sealed, and labeled for rotation
- Do a 24-hour test run so you can remove friction points early
- Add a simple, repeatable water treatment routine matched to your source
- Add redundancy so one failure doesn’t take down your whole plan
Simple beats complicated—especially with water, where consistency and clear steps matter more than fancy setups.
Conclusion
If you want Off-Grid Water Made Simple: How to Stay Supplied Without City Water (Even If You’re a Beginner), the biggest shift is moving from “random tips” to a calm system you can actually use.
Start with the basics: a minimum target, real storage, and a routine you can repeat without thinking too hard. Then add the next layer only when the first layer feels solid.
When you picture the next outage, trip to a rural property, or week of unpredictable conditions, the goal isn’t to feel intense—it’s to feel clear. You know where your water comes from, how you store it, and what you do before you drink it.
If you want to see a structured walkthrough to compare against your plan, watch the WaterSmartBox presentation next.
SEE THE FULL PRESENTATION HERE